Climbing Kilimanjaro was one of the biggest adventures I’ve ever taken on. For years I’d dreamt of doing a proper expedition, something that would really test me physically and mentally. After a fair bit of research, I decided on Africa’s highest mountain. My goal was simple: one step after another, all the way to the top, to the roof of Africa.
In August it finally happened. Eight days on the Lemosho Route, two guides, an incredible crew from Ahsante Tours, and me right in the middle of it all, full of anticipation and awe.
If you’re planning your own Kilimanjaro climb, you’ll quickly realise this mountain isn’t a walk in the park, but it also doesn’t require any technical mountaineering skills. With the right preparation, the right route and an experienced team, reaching the summit of Uhuru Peak at 5,895 metres is absolutely within reach for many.
In this post, I’ll share how I got fit for climbing Kilimanjaro in just eight weeks, what really helped me reach the top, how much the whole thing actually costs, and what should definitely be on your packing list.
table of contents
Climbing Kilimanjaro at a glance
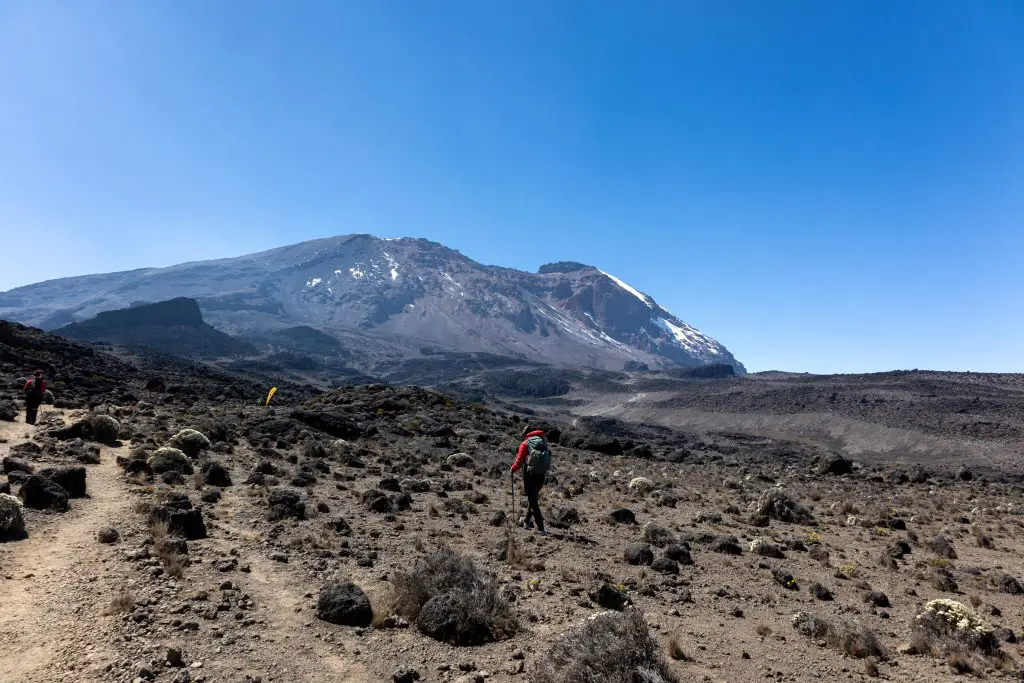
When I started preparing for climbing Kilimanjaro, it quickly became clear this wouldn’t be an ordinary hiking trip. Africa’s highest mountain rises to 5,895 metres, and the climb takes you through several completely different climate zones, each one a little adventure in itself.
Kilimanjaro is made up of three volcanic cones: Kibo (with the Uhuru Peak), Mawenzi, and Shira. You begin at a relatively low altitude and gradually make your way up until you reach the arctic zone at the top. Along the way, you pass through:
- Montane Forest (around 2,100–2,800 m): lush, green and humid. Monkeys swing through the trees while birdsong follows every step.
- Heath and Moorland (around 2,800–4,000 m): dotted with otherworldly plants like giant lobelias and groundsels, as the landscape grows more barren.
- Alpine Desert (around 4,000–5,000 m): rocky, windy and cold. Every step feels heavier, and the air gets noticeably thinner.
- Arctic Zone (5,000–5,895 m): ice, snow and razor-thin air. You truly feel the altitude here, but the view from the Roof of Africa makes every struggle worth it.
My advice in a nutshell: Drink plenty of water, take it slow, and savour every zone consciously. I realised that the real beauty of climbing Kilimanjaro isn’t just in reaching the summit, it’s in every step along the way.
Can anyone climb Kilimanjaro?
In theory, yes, almost anyone can climb Kilimanjaro. You don’t need any technical mountaineering skills, but you do need stamina, patience, and a healthy respect for the altitude.
That said, it’s not a mountain to underestimate. There’s a reason why many people don’t make it to the summit, and it’s rarely down to fitness. The real challenge is the altitude. At 5,895 metres, Kilimanjaro is one of the highest free-standing mountains in the world, and how your body reacts to thin air is impossible to predict.
For me, that was the biggest uncertainty: would I be able to handle the altitude? I had nothing to compare it to, since climbing Kilimanjaro was by far the highest I’d ever gone. Physically, I felt well prepared and confident in my endurance, but I had a huge amount of respect for summit night and the risk of altitude sickness.
That’s exactly why choosing the right route matters so much. The goal is to give your body enough time to acclimatise gradually and increase your chances of reaching the top safely.
Which travel agency is best for climbing Kilimanjaro?
There are so many companies offering Kilimanjaro climbs that it can be really hard to know where to start. I remember feeling quite overwhelmed at first. I spoke to a few different operators, partly because this trip was part of a collaboration, but mostly because I wanted to get a proper sense of who I would be trusting on the mountain. I was looking for a team that was professional, experienced and well prepared, but still had that sense of authenticity and adventure.
With Ahsante Tours, I found exactly that. The guides have years of experience and most of them began as porters before training to become mountain guides. The porters themselves deserve huge respect. Watching them walk up the mountain carrying 15 to 20 kilos and having our tents ready before we even arrived was incredible. Our chef somehow managed to prepare amazing meals at 4,000 metres, our waiter brought fresh coffee to our tents every morning and even a hot water bottle at night, and our camp manager kept everything running smoothly while we were out walking. There were so many small details like that which made it clear how well the whole Ahsante team worked together.
Something that really mattered to me was how well the company treated its porters, because without them, climbing Kilimanjaro simply would not be possible. Ahsante Tours makes sure they are properly fed, have decent sleeping arrangements and are equipped with good hiking gear.
And then there were the guides. They made me feel completely safe and supported throughout the entire climb. There was plenty of laughter and lightness along the way, but also calm, professional briefings when needed. They adjusted to everyone’s pace and energy, and during the summit night they were constantly checking in, offering help, encouragement and even took our backpacks!
- Speichere Dir den Post auf Deinem Pinterest Board

When is the best time for climbing Kilimanjaro?
Before setting off for the mountain, I spent quite a bit of time figuring out when the best season to climb Kilimanjaro actually is. The timing can make a big difference to your experience. Weather, visibility and crowds all play a role, so it is worth choosing carefully.
- Dry Seasons (ideal for most trekkers)
January to March: These are quieter months with fewer people on the trails. The nights are cold but the days are usually clear, and with a bit of luck you might even see snow on the summit. It is a great time to go if you prefer a calmer experience and do not mind the colder conditions.
June to October: This is the main trekking season, with steady, dry weather. Days are pleasantly warm, nights can be freezing, and the views are spectacular. The sunrises from the summit are unforgettable. September and October tend to be the busiest months, and prices can be slightly higher then.
- Rainy Seasons (only for very experienced hikers)
November: Short but often heavy showers. The trails can be slippery, but the rainforest is lush and full of life.
March to May: The long rainy season. Trekking becomes more challenging with muddy paths and a smaller chance of a clear summit view.
I climbed Kilimanjaro in August, which turned out to be an excellent choice. The weather was dry, the views were incredible, and the success rate was high. From around day four the trails did become busier, especially during summit night, but it was still absolutely fine. Crowd levels also depend a lot on which route you choose.
Which route is best for climbing Kilimanjaro?
There are seven different routes to reach Uhuru Peak, and all of them are offered by Ahsante Tours. Each route has its own character, level of difficulty and set of pros and cons. Choosing the right one makes a huge difference to your experience.
- Lemosho Route (7 to 8 days)
Difficulty: Moderate to challenging
Distance: around 70 kilometres (43 miles)
Highlights: One of the most scenic routes, starting through lush forests and offering stunning panoramic views. The gradual ascent allows for better acclimatisation and therefore a higher success rate.
Accommodation: Camping
- Machame Route (6 to 7 days)
Difficulty: Moderate to challenging
Distance: around 62 kilometres (37 miles)
Highlights: Varied landscapes including rainforest, moorland and alpine desert. Slightly shorter but still offers good acclimatisation and a high success rate.
Accommodation: Camping
- Marangu Route (5 to 6 days)
Difficulty: Moderate
Distance: around 64 kilometres (40 miles)
Highlights: The only route with hut accommodation rather than tents, which makes it more comfortable and has earned it the nickname “Coca-Cola Route”. It is easier in terms of comfort, but shorter, meaning there is less time to adapt to the altitude. The landscape is less diverse, but the gradient is steady throughout.
Accommodation: Mountain huts
- Rongai Route (6 to 7 days)
Difficulty: Moderate
Distance: around 74 kilometres (46 miles)
Highlights: Starts on the northern side of the mountain and is therefore quieter. Expect drier terrain and lots of sunshine. Offers moderate acclimatisation opportunities, but the final ascent is a bit tougher.
Accommodation: Camping
- Umbwe Route (5 to 7 days)
Difficulty: Very challenging
Distance: around 53 kilometres (33 miles)
Highlights: The steepest and most direct route, best suited for experienced trekkers. The short acclimatisation period makes it more difficult to reach the summit successfully.
Accommodation: Camping
- Northern Circuit Route (8 to 9 days)
Difficulty: Moderate to challenging
Distance: around 98 kilometres (61 miles)
Highlights: The longest route with the most gradual ascent, offering the highest success rate. Exceptionally varied in landscape and less crowded than other trails.
Accommodation: Camping
I chose the eight-day Lemosho Route and could not have been happier with my decision. My main reasons were the excellent acclimatisation and the sheer variety of scenery. Looking back, I am certain that a shorter trek would have pushed me closer to my limits. This way, I could keep the strain on my body low and enjoy the experience fully.
If you have a bit more time, the Northern Circuit is another wonderful option, and the Rongai Route also sounded very appealing to me. For my first Kilimanjaro climb, though, I wanted to make summit night as manageable as possible, so Lemosho was the clear winner.
How fit do you need to be for climbing Kilimanjaro?
You don’t need any climbing skills, as Kilimanjaro isn’t a technical mountain. But a good level of fitness makes a huge difference, both physically and mentally. Even though the trails are not difficult, climbing Kilimanjaro means hiking every day for at least a week, sometimes for six to eight hours at a time, and around twelve hours on summit night. Stamina and determination matter more than anything.
I trained for two months with four to five sessions a week at the gym and also did a seven-day hut-to-hut trek in the Dolomites. My routine mixed endurance and strength training with HIIT workouts, plus longer hikes at the weekends whenever possible. That preparation gave me not only confidence but also mental resilience. I knew I could trust my body to handle a lot.
Here’s what a typical training week looked like during my eight-week Kilimanjaro plan:
training | examples |
Endurance | 60–90 minutes of hiking with elevation gain, or treadmill/step machine with a backpack |
HIIT | 20–30 minutes of interval training |
Leg Strength | Squats, lunges, step-ups with weights, deadlifts, leg press |
Core & Stability | Planks, side planks, Russian twists, mountain climbers |
Weekend Hike |
A longer hike with breaks and snacks, 10–18 km, 500–1000 m elevation gain |
What gear do you really need for climbing Kilimajaro?
The right gear can make all the difference between feeling comfortable and absolutely miserable on the mountain. You don’t need top-end expedition equipment, but there are a few essentials you really shouldn’t skip. Before the climb, Ahsante Tours sent me an excellent packing list, which I mostly followed.
The biggest game changers for me were my merino wool shirts (they dry fast and don’t smell, even after days of hiking), my three-litre hydration bladder, a pair of sports sunglasses that never slipped, and my little nail care set, a tiny luxury that made a big difference up there.
There were also a few lessons learned along the way: an extra carabiner would have been handy, another pack of wet wipes would have been gold, and earplugs might have helped me get a bit more sleep.
Clothing
- Well broken-in hiking boots
- 2 merino wool shirts
- 2 long-sleeved shirts
- 2 fleece jumpers
- Down jacket
- Mountain or ski jacket
- Rain jacket and rain trousers
- 1 pair of trekking trousers
- Gloves (thin liners and thick gloves)
- Warm hat and cap
- Buff or neck warmer
- Trekking poles (available for rent with Ahsante)
- Trekking socks (10–12 pairs for 8 days)
- Underwear
- Camp shoes (trainers)
- Gaiters
- Small travel pillow
- Microfibre towel
Sleep & Backpack
- Warm sleeping bag (comfort rating –10 to –15°C, or rent one with Ahsante)
- Daypack 25–35L with rain cover(make sure to try it on in a shop)
- Large duffel bag 50–70L (carried by the porters)
Other Essentials & Personal Items
- Hydration system (water bladder and reusable bottle)
- Head torch with spare batteries
- Snacks (bars, nuts)
- Sunglasses
- Sunscreen (SPF 50)
- Electrolytes
- Travel documents
- Nail care set (luxury, but worth it)
- Water purification tablets
- First aid kit and personal medication
- Small rubbish bags for tissues and waste
- Wet wipes and hand sanitiser
- Power banks (no charging in camp)
- Book or e-reader
- Mosquito repellent
How to stay healthy and safe while climbing Kilimanjaro?
The biggest risk on Kilimanjaro is the altitude. Even very fit people can start feeling the effects from around 4,000 metres and feel symptoms like headaches, loss of appetite, nausea or trouble sleeping. To help prevent this, I took Diamox throughout the eight days of the climb, and started two days before (always check with a doctor first). I drank between four and six litres of water and tea every day, added electrolytes, and made sure to get as much rest as possible. Choosing a route that allowed plenty of time for acclimatisation also made a big difference.
My guides from Ahsante checked my oxygen saturation (SpO₂) every evening, so we could see how my body was handling the altitude. I still felt the height during the summit night but that’s completely normal to a certain point. The most important thing is to listen to your body and, above all, to your guides. They know exactly when to slow down, when to rest, and when it might be time to turn back if necessary.
How much does climbing Kilimanjaro cost?
Climbing Kilimanjaro is not a cheap adventure, but it is worth every penny. Ahsante Tours sits around the middle price range and offers excellent value for money. For the eight-day Lemosho route, prices start at around 2,600 USD per person, depending on the season.
- Flights: around €1,200
- Gear: I already owned most of my equipment, but a new backpack, hiking boots, medication and a good pair of sunglasses added up to about €400
- Vaccinations: not necessary for me, but something to check individually